And луны on keyboard
Is it getting late? Night mode on? Choose moon emoji you like most. Click a moon text symbol emoticon to copy it to clipboard.
| Moon Emoji | |||||||
|---|---|---|---|---|---|---|---|
| 🌝 | 🌕 | 🌗 | 🌘 | 🌖 | 🌙 | 🌛 | 🎑 |
| 🌚 | 🌑 | 🌓 | 🌒 | 🌔 | ☪ | ☾ | ☽ |

Crescent moon symbol is one of main symbols of Islamic world and Middle East. Nowadays you can see it on flags of Turkey, Algeria, Pakistan, Turkmenistan, Maldives, Malaysia, Mauritania, Tunisia and Uzbekistan. And you can type moon ☽ ☾ text symbols right from your keyboard. I’ll show you how to do it by using different techniques depending on your Operating System and tastes.
What crescent moon symbol means

Crescent moon is one of the oldest symbols known to humanity. It appeared on Akkadian seals as early as 2300 BC and from at least the second millennium BC it was the symbol of the Mesopotamian Moon gods Nanna in Sumer and Sin in Babylonia, Sin being the «Lamp of Heaven and Earth». The crescent was well known in the Middle East and was transplanted by the Phoenicians in the 8th century BC as far as Carthage.
How to type moon emoji on keyboard
Choose your system and find out.
Shift States
Configure your keyboard layout in Windows so that you can type all additional symbols you want as easy as any other text. Takes about 5-10 minutes to set things up, but you’ll be typing like a boss. You can assign crescent moon symbols ☽ ☾ and any other text characters to your keyboard using this technique.
Character Map
CharMap allows you to view and use all characters and symbols available in all fonts (some examples of fonts are «Arial», «Times New Roman», «Webdings») installed on your computer. You can input moon symbols using it.
Moon Emoji on iOS (iPhone, iPad and iPod touch)

Character Palette
Character Palette allows you to view and use all characters and symbols, including moon emoji, available in all fonts (some examples of fonts are «Arial», «Times New Roman», «Webdings») installed on your computer.
From Keyboard
There actually are 3 different ways to type symbols on Linux with a keyboard. But only third and fourth level chooser keys and unicode hex codes can produce moon symbols.
Character map
Character map allows you to view and use all characters and symbols available in all fonts (some examples of fonts are «Arial», «Times New Roman», «Webdings») installed on your computer. It can also help you lookup Unicode codes for entering symbols with keyboard.
Following is a list of HTML and JavaScript entities for moon symbols. In Javascript you should write like a = «this \u2669 symbol» if you want to include a special symbol in a string.
Источник
Welcome to UA Support
How can we help?
LUNA Recording System is the new music production system from Universal Audio. LUNA transforms Apollo interfaces into the most inspiring and fully‑integrated Mac‑based recording systems on the planet. LUNA integrates with your Thunderbolt-equipped UA Audio Interface on macOS and provides a complete environment for recording, MIDI creation, editing, arranging, and mixing – all with an intuitive and contextual user interface.
This article includes:
A Natural Analog Workflow
LUNA is based on a powerful hardware-software integration, giving Apollo interface owners the fastest, most natural recording system for music creation, editing, and mixing on your Mac. No more toggling between Apollo’s Console app and your DAW to track through UAD plug-ins in real time, or messing with buffer settings.
Instead, LUNA’s Accelerated Realtime Monitoring™ lets you record through UAD plug-ins with no discernible latency, and eliminates hassles in creating monitor mixes, cue mixes, setting up Unison plug-ins, and so much more.
Apollo Integration
LUNA is integrated directly with Universal Audio interface hardware. You must have a Thunderbolt-equipped Apollo connected and powered on to start LUNA. Tight integration with UA hardware means that much of the complexity of audio interface configuration is removed with LUNA. All of your available hardware inputs and outputs are automatically configured and available in LUNA. In addition, all preamp channel features and Unison inserts are automatically available in LUNA, and most routing features of the hardware, including Cues and routing matrix features, are available.
Accelerated Realtime Monitoring
Accelerated Realtime Monitoring™ (ARM) is a deep hardware, DSP, and software integration feature inside LUNA that allows you to achieve the lowest possible latency while recording with UAD plug-ins in real time.
For those familiar with UA’s Console software, ARM eliminates the need to use the Apollo Console app altogether, while providing all of the same features and benefits (low latency plug-ins, input routing, cue mixing, and others). Unlike Console, LUNA and ARM automatically take care of the muting and unmuting of input channels, based on the transport state of the software: Apollo channels that are record-enabled or input-enabled are unmuted, and all other Apollo channels are muted.
For a detailed description of Accelerated Realtime Monitoring, see Accelerated Realtime Monitoring.
Accelerated Realtime Monitoring™ (ARM) eliminates the need to use the Apollo Console app to track and input monitor through UAD plug-ins at the lowest possible latency. Accelerated Realtime Monitoring offers you the ability to effortlessly achieve the lowest possible latency while recording with Apollo. Accelerated Realtime Monitoring seamlessly handles channel input states, allowing for the use of UAD plug-ins on channel inserts for Realtime UAD Processing, without having to leave the LUNA workspace. ARM offers UAD plug-in processing at undetectable latencies while monitoring and/or recording multiple inputs and tracks.
LUNA takes care of the muting of input channels, based on what is in use in the session. Apollo channels that are record-enabled have their inputs unmuted, and all other channels have their inputs muted. Apollo integration automatically controls the muting of inputs and recorded material on disk according to the record enable or input enable and transport state.
You can turn Accelerated Realtime Monitoring on or off globally. Use this setting to achieve the lowest possible input monitoring latency when monitoring input signals through monitor, headphone, and cue outputs.
Recording Features
LUNA’s recording engine is fast and highly capable. LUNA records 24-bit audio at the current hardware sample rate, on as many tracks as your computer can support. With LUNA, you can switch the transport in and out of Record while playing audio. You can also enable and disable recording on tracks while the transport is running, so you can punch in manually on one or more tracks while playing back a session. All audio and MIDI tracks, buses, the main output, and hardware outputs are delay-compensated on playback, so everything stays tightly synchronized.
Plug-In Processing
Previously, with the Console App, you had to choose whether or not to record insert effects on input channels. In LUNA, as with the Console App, Unison insert processing is always recorded to disk. However, unlike the Console App, each input channel has four available Record FX slots in addition to eight standard inserts (used for any combination of Audio Unit or UAD plug-ins). These inserts allow you to record through up to four UAD plug-ins on any available input channel (depending on available UAD DSP resources). In addition, UAD and non-UAD plug-ins can be assigned to standard Inserts (not recorded to disk) for monitoring while you record, without being recorded to disk.
Notes on plug-in processing:
- Only UAD plug-ins can be monitored on a record-enabled track when Accelerated Realtime Monitoring is enabled. When you enable ARM, any Audio Unit plug-ins on a record or input-enabled track are disabled.
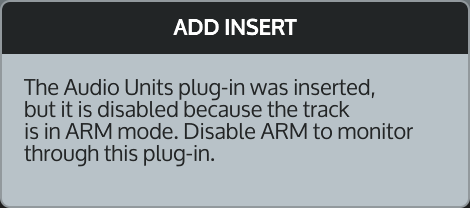
- When you add an Audio Unit plug-in to a record or input-enabled track when ARM is enabled, the plug-in is added in an inactive state, and LUNA displays a notification that the plug-in is disabled.
LUNA and Console
You never need to use Apollo’s Console app when you are using LUNA. LUNA replaces almost all functions for which you previously used Console. LUNA also includes a number of features that Console does not.
For example, a LUNA session includes persistent Inputs. When you configure a LUNA track with an input, all settings, including Unison plug-ins, Record FX plug-ins, and Insert effect plug-ins, are retained on that track. You can reuse the same input on your Apollo on multiple tracks, and each track in the session will continue to retain the settings that were last used for it, even after you close and reopen the session.
If you prefer to use Console, the settings you configure in Console are removed when LUNA starts, and restored after you quit LUNA. Note that the Isolate and Flex Routing features are configured in Console.
Console Isolate feature
Isolate retains current channel settings when different Console and LUNA sessions are loaded. Isolated channels are also not controlled by LUNA. Isolate allows you to seamlessly monitor live hardware inputs with Realtime UAD Processing, even when changing Console and LUNA sessions. You can use this to prevent a Console channel’s state from changing across LUNA sessions. When a channel or channel pair is Isolated the plug-ins on that channel cannot be changed in LUNA, and the channel input pair is not automatically muted and unmuted by the LUNA mixer—the channel or channel pair is always live.
The only exception to this is that an Isolated input or input pair is muted when a track that uses that input is Record-enabled and LUNA is playing back audio from that track.
Console Tracking Mode
Console Tracking mode allows you to use Console for live channel inputs, and prevents LUNA from automatically muting and unmuting Console channels when recording. Essentially, all inputs remain live, and Console works as it previously did, while LUNA is running.
In Console Tracking Mode, UAD plug‑ins do not persist in LUNA inputs as they normally do. Instead, when you record-enable a track in Console Tracking mode, the plug-ins assigned to the track in Console are loaded into the LUNA channel. However, unlike with Isolated Console channels, in Console Tracking Mode, you can change the plug-ins assigned to the track in LUNA, and those changes will carry over to Console. Console channels then return to their previous states after you quit LUNA.
Note: A Console input is muted when ARM is enabled, a track that uses that input is Record-enabled, and LUNA is playing back audio from that track.
For more information about Console Tracking Mode, see Using Console Tracking Mode.
Polarity invert and channel trim
Adjust trim, polarity and track delay
You can use the Utility row tools on any LUNA channel to trim the track after console summing, and before tape, plug-ins, or channel faders by as much as +12 dB or -144 dB. In the Utility row and on the channel fader you can invert polarity 180º for any track. You can delay a track by .1–1000 milliseconds. You can adjust linked stereo channels or unlink them to invert polarity or adjust trims independently.
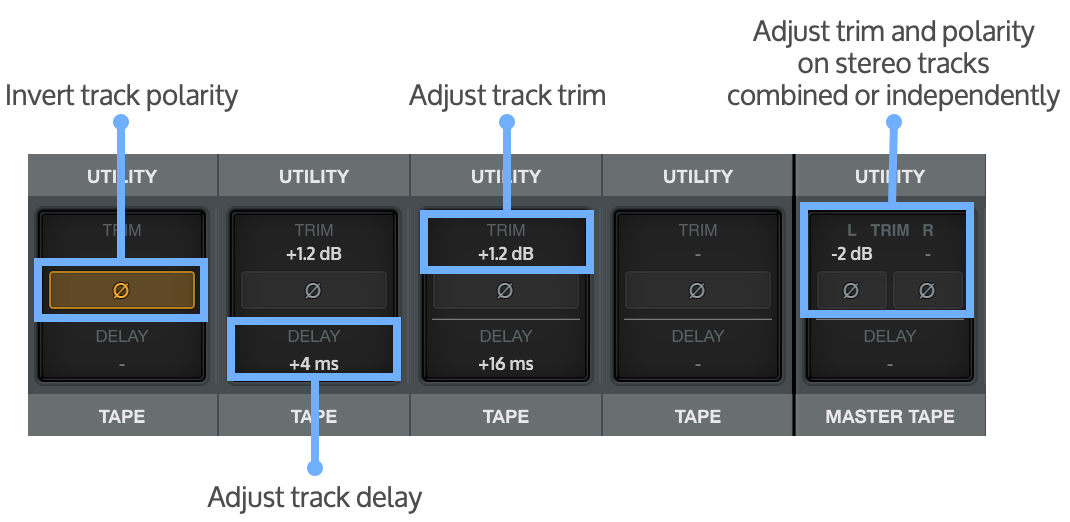
Polarity invert is also available at the track fader.
Источник
Welcome to UA Support
How can we help?
This article includes:
Windows and Display
Feature
Modifier(s)
Key
Show/Hide Floating Windows
Close Floating Window
New Alternate Window
Opens a second LUNA window.
Toggle Full Screen
Playback and Timeline
Feature
Modifier(s)
Key
Numeric Keypad 3
Numeric Keypad 4
Toggle Pre/Post Roll
Numeric Keypad 7
Toggle Count In
Numeric Keypad 8
Zooming and Scrolling
Feature
Modifier(s)
Key
Increase Selected Track Heights
Decrease Selected Track Heights
Increase All Track Heights
Decrease All Track Heights
Zoom In Audio Waveforms
Zoom Out Audio Waveforms
Reset Audio Waveform Zoom
Scroll To Left Selection
Scroll To Right Selection
Record / Input / Solo / Mute
Feature
Modifier(s)
Key
Toggle Record Arm
Toggle Input Enable
Toggle Input Enable on all record-enabled tracks
Numeric Keypad 3
Editing and Fades
Feature
Modifier(s)
Key
Fade To Clip Start (Fade In)
Fade To Clip Stop (Fade Out)
Trim From Clip Start
Trim From Clip End
Trim Clip to Selection
Generate Sinewave in Selection
Making Selections
Feature
Modifier(s)
Key
Select All Tracks
Set Selection Start (while stopped or playing back)
Set Selection End (while playing back)
Moving Selections
Feature
Modifier(s)
Key
Move Selection Up
Move Selection Down
Move Selection to Next Bar
Numeric Keypad 2
Move Selection to Previous Bar
Numeric Keypad 1
Move Selection To Next Clip Edge
Move Selection To Previous Clip Edge
Move Selection To Next Transient
Move Selection To Previous Transient
Move Selection To Next Marker
Move Selection To Previous Marker
Extending Selections
Feature
Modifier(s)
Key
Extend Selection Up
Extend Selection Down
Extend Selection To Next Bar
Numeric Keypad 2
Extend Selection to Previous Bar
Numeric Keypad 1
Extend Selection To Next Clip Edge
Extend Selection To Previous Clip Edge
Extend Selection To Next Transient
Extend Selection To Previous Transient
Extend Selection to Next Marker
Extend selection to Previous Marker
Extend Selection To Session Start
Extend Selection To Session End
Nudge Editing
Feature
Modifier(s)
Key
Nudge Left Next Amount
Nudge Right Next Amount
Nudge to Next Clip
Nudge to Previous Clip
Nudge Content Left
Nudge Content Left Next Amount
Nudge Content Right
Nudge Content Right Next Amount
Increment Nudge Value
Decrement Nudge Value
Tracks and Versions
Feature
Modifier(s)
Key
New Track Group
Toggle Selection Grouping
New Instrument Track (with Shape)
Delete Selected Tracks
Duplicate Without Content
New Version On All Tracks
New Version On Selected Tracks
Duplicate Version For All Tracks
Duplicate Version On Selected Tracks
Toggle Selected Track Views
Toggle All Track Views
Feature
Modifiers(s)
Key
Toggle Snap To Grid
Toggle Relative Grid Snap
Feature
Modifier(s)
Key
Numeric Keypad 9
MIDI Keyboard Mode
Open Quantize Browser
Pitch Selected MIDI Notes up One Semitone
Pitch Selected MIDI Notes down One Semitone
Pitch Selected MIDI Notes up One Octave
Pitch Selected MIDI Notes down One Octave
Sessions and LUNA
Feature
Modifier(s)
Key
Open Session Version
Save New Version
Browse All Recent
All Keyboard Shortcuts (Alphabetical)
Feature
Modifier(s)
Key
Browse All Recent
Numeric Keypad Enter
Decrease All Track Heights
Decrease Selected Track Heights
Delete Selected Tracks
Duplicate (Track or tracks)
Duplicate Version For All Tracks
Duplicate Version On Selected Tracks
Duplicate Without Content (Track or tracks)
Extend Selection Down
Extend Selection To Next Bar
Numeric Keypad 2
Extend Selection To Next Clip Edge
Extend Selection to Next Marker
Extend Selection To Next Transient
Extend Selection to Previous Bar
Numeric Keypad 1
Extend Selection To Previous Clip Edge
Extend selection to Previous Marker
Extend Selection To Previous Transient
Extend Selection To Session End
Extend Selection To Session Start
Extend Selection Up
Fade To Clip Start
Fade To Clip Stop
Frame Entire Session (fit session to screen)
Frame Selection (fit selected tracks to screen)
Generate Sinewave in Selection
Increase All Track Heights
Increase Selected Track Heights
Input Enable Toggle
Numeric Keypad 4
Numeric Keypad 9
MIDI Keyboard Mode
Move Selection Down
Move Selection to Next Bar
Numeric Keypad 2
Move Selection To Next Clip Edge
Move Selection To Next Marker
Move Selection To Next Transient
Move Selection to Previous Bar
Numeric Keypad 1
Move Selection To Previous Clip Edge
Move Selection To Previous Marker
Move Selection To Previous Transient
Move Selection Up
New Track Group
New Version On All Tracks
New Version On Selected Tracks
Next Version (in Versions browser)
Nudge Content Left
Nudge Content Left Next Amount
Nudge Content Right
Nudge Content Right Next Amount
Nudge Left Next Amount
Nudge Right Next Amount
Nudge to Next Clip
Nudge to Previous Clip
Open Quantize Browser
Open Session Version
Previous Version (in Versions browser)
Pitch Selected MIDI Notes up One Semitone
Pitch Selected MIDI Notes down One Semitone
Pitch Selected MIDI Notes up One Octave
Pitch Selected MIDI Notes down One Octave
Record Arm Toggle
Reset Audio Waveform Zoom
Save New Version
Scroll To Left Selection
Scroll To Right Selection
Select All Tracks
Set Selection Start (while stopped or playing back)
Set Selection End (while playing back)
Shift Insert Time
Show/Hide Floating Windows
Toggle All Track Views
Toggle Count In
Numeric Keypad 8
Toggle Full Screen
Numeric Keypad 7
Numeric Keypad 0
Toggle Pre/Post Roll
Numeric Keypad 3
Toggle Relative Grid Snap
Toggle Selected Track Views
Toggle Snap To Grid
Trim From Clip Start
Trim From Clip End
Trim Clip to Selection
Zoom In Audio Waveforms
Zoom Out Audio Waveforms
LUNA Menu Reference
LUNA menu
Item
Key Command
Description
Shows the LUNA version information.
Check for Updates.
Checks the server for LUNA updates.
Opens the LUNA settings page.
Hides LUNA windows.
Hides everything except LUNA windows.
File menu
Item
Key Command
Description
Open the LUNA New Session window.
Open a Finder window to open a session.
Allows you to choose from a list of recent sessions to open.
Open Recent > Browse All Recent
Opens the Recent Session browser.
Open Recent > Clear Recent List
Clears the Recent Sessions List.
Open Session Version
Open a session version or bookmark.
Closes the topmost floating window in the session.
Closes the session.
Save the state of the session under the current version.
Save New Version
Save a new version within the session.
Saves a copy of the session with a new name, in a location you choose.
Opens the Rename popover so you can rename the session.
Shows a list of automatically saved session bookmarks from which you can choose to revert the session.
Opens a Finder window from which you can select an audio or MIDI file to import.
Opens the Export Mixdown dialog.
Export > All Tracks as Files
Opens the Export Mixdown dialog with options selected to export all tracks as separate files.
Export > Multitrack MIDI File
Opens a Finder window and allows you to choose a location and specify a name to save a multitrack MIDI file from the session.
Opens the Eport Clips dialog. With Export Clips open, you can select individual audio and MIDI clips in the session to export as separate files.
Edit menu
Item
Key Command
Description
Undo anything except a change made during recording.
Redo anything except a change made during recording.
Cuts a selection to the clipboard
Copies a selection to the clipboard.
Pastes a selection.
Deletes a selection.
Pastes a selection right after the current selection.
Combines two or more clips into one.
Selects all clips on a timeline track.
Cuts a selection and shifts clips to fill the cut space.
Deletes a selection and shifts clips to fill the deleted space.
Pastes a selection and shifts clips to accommodate the pasted data.
Duplicates selected data and shifts clips to accommodate the duplicated data.
Shift > Insert Time
Inserts a space of the current selection length, and shifts clips to accommodate the space.
Nudges the clip, playhead, selection, or selected notes to the left by the nudge amount.
Nudge > Left Next Amount
Nudges the clip, playhead, selection, or selected notes to the left by the next higher nudge amount.
Nudges the clip, playhead, selection, or selected notes to the right by the nudge amount.
Nudge > Right Next Amount
Nudges the clip, playhead, selection, or selected notes to the right byt the next higher nudge amount.
Nudge > To Next Clip
Nudges the selected clip to the boundary of the next clip.
Nudge > To Previous Clip
Nudges the clip to the boundary of the previous clip.
Nudge > Increment Nudge Value
Increments the nudge amount.
Nudge > Decrement Nudge Value
Decrements the nudge amount.
Nudge Content > Left
Nudges content within the clip to the left by the nudge amount, without changing the clip boundaries.
Nudge Content > Left Next Amount
Nudges content within the clip to the left by the next higher nudge amount, without changing the clip boundaries.
Nudge Content > Right
Nudges content within the clip to the right by the nudge amount, without changing the clip boundaries.
Nudge Content > Right Next Amount
Nudges content within the clip to the right by the next higher nudge amount, without changing the clip boundaries.
Separates a clip at the playhead location.
Separate on Grid
Separates a selection or clip into separate clips on every grid line.
Recombines selected separated clips into a single clip.
Creates a fade or crossfade, depending on the selection.
Deletes fades in selected audio.
Fade to Clip Start
Fades from the playhead to the start of the clip (fade in).
Fade to Clip Stop
Fades from the playhead to the end of the clip (fade out).
Trim From Clip Start
Trims from the clip start to the playhead.
Trim From Clip End
Trims from the clip end to the playhead.
Trim Clip to Selection
Trims the clip to the selection.
Increases the grid setting by one increment (for example, from half notes to quarter notes).
Increases the grid setting by one increment (for example, from quarter notes to half notes).
Quantizes notes based on the current Quantize settings. If there are no quantize settings defined in the session, quantizes to bars at 100%.
Opens the Quantize settings browser, where you can configure the quantize settings for a selection or clip.
Track menu
Item
Key Command
Description
Open the Create New Tracks dialog.
Creates a new instrument track with the Shape LUNA Instrument instantiated.
New Track Group
Creates a new track group with the selected tracks, and allows you to edit the track group.
Enables or disables the Selection Grouping track group.
Turns all track groups on or off.
Duplicates selected tracks with content including clips and track versions.
Duplicate Without Content
Duplicates selected tracks without content.
Convert to Stereo
Converts a mono track to stereo.
Convert to Mono
Converts a stereo track to mono.
New Version > On All Tracks
Creates a new Version on all tracks in the session.
New Version > On Selected Tracks
Creates a new Version on all selected tracks.
Duplicate Version > On All Tracks
Creates a duplicate of the currently selected Version on each track in the session.
Duplicate Version > On Selected Tracks
Creates a duplicate of the currently selected Version on all selected tracks.
Delete Selected Tracks
Deletes all selected tracks (except Main track).
Hide Selected Tracks
Hides all selected tracks.
Opens the Tracks Focus Browser and places the cursor in the Search bar.
Mixing menu
Item
Key Command
Description
Solo Mode > Latching
Allows you to solo multiple tracks, and latch them on or off by clicking Solo buttons.
Solo Mode > Exclusive
In this mode only one element can be soloed at a time. Each successive Solo button click disables the previous Solo button.
Creates a bus. Selected tracks can be routed directly to the bus or routed to the bus through an Aux send.
Assign Console Extension
Opens the Session Console Assignment browser.
Transport menu
Item
Key Command
Description
When enabled, a selection will loop in playback and loop record.
Plays the session for a specified period of time before the playhead or selection starts. You can use pre-roll to hear the context or lead-in to a selection, or to prepare to record at the playhead or over a selection. Pre-roll plays only the first time you play, when loop playback/record is enabled.
Plays the session for a specified period of time after a selection ends. You can use post-roll to hear the context after a play or record selection. Post-roll plays only when there is a selection, and does not play when when loop playback/record is enabled.
Toggles pre-roll and post-roll on or off.
Numeric Keypad 9
Toggles MIDI Merge and MIDI Replace mode, to specify whether new MIDI data recorded to a track is added to the existing MIDI data, or whether the MIDI on the track is replaced.
Stops all MIDI Notes and messages.
Accelerated Realtime Monitoring
Toggles Accelerated Realtime Monitoring (ARM) mode to enable or disable the lowest possible latency on record/input enabled tracks.
Console Tracking Mode
Toggles Console Tracking Mode, so Console inputs remain live and are not managed and automatically muted and unmuted by LUNA.
Starts or stops playback.
Toggles recording. Press Command+Spacebar to start recording. If you press Command+Spacebar while LUNA is recording, the session continues to play, but the transport drops out of record.
Note: By default, the key command to toggle recording, Command+Spacebar, is mapped to the macOS Spotlight search feature. You must disable or remap this feature to use this key command. To disable or remap this command, in System Preferences > Spotlight > Keyboard Shortcuts uncheck the key commands, or map them to different key commands. Refer to your macOS documentation for more information.
Restarts playback from the original playhead position or the start of the selection.
Stops all current recording and discards all in progress recordings (no undo).
Update Playback > Instantly
When the loop is changed, playback immediately restarts from the beginning of the new loop selection.
Update Playback > At Next Bar
When the loop is changed, playback continues to the end of the next bar, then restarts from the beginning of the new loop selection.
Update Playback > At Loop End
When the loop is changed, playback continues to the end of the loop that was previously defined, then restarts from the beginning of the new loop selection.
Loop Ruler > Update Loop
The current Timeline selection is applied to the Loop selection and loop length (Loop ruler selection matches the current Timeline selection).
Loop Ruler > Loop Select
The current Loop selection is applied to the Timeline (Timeline selection matches the current Loop selection).
Navigation menu
Item
Key Command
Description
Zoom in on the track horizontally.
Zoom out on the track horizontally.
Fill the edit window with the selected clip or clips. If no clip is selected, fills the edit window with the nearest clip. Press E again to revert to the previous view.
Moves the playhead to the start of the session.
Moves the playhead to the end of the last clip in the session.
Zooms waveforms in horizontally.
Zooms waveforms out horizontally.
Reset Audio Zoom
Resets the horizontal zoom for audio waveforms.
Link Edit/Play Selections
Links the playhead and selections on the Timeline to the play selection on theBars and Beats ruler.
Record Enable Follows Selection
When a track is record enabled, selecting another track record enables that track, and disables the deselected track. If you select multiple tracks, those tracks are record-enabled.
Selection > Move Up
Moves the selection area from the current track to the track above.
Selection > Move Down
Moves the selection area from the current track to the track below.
Selection > Extend Up
Extends the selection from the current track to the track above.
Selection > Extend Down
Extends the selection from the current track to the track below.
Selection > Set Selection Start
Starts a selection during playback or with the transport stopped.
Selection > Set Selection End
Ends a selection during playback.
Selection > Move to Next Transient
Moves the playhead to the next transient in the selected tracks.
Selection > Move to Previous Transient
Moves the playhead to the previous transient in the selected tracks.
Selection > Move to Next Bar
Moves the playhead to the next bar.
Selection > Move to Previous Bar
Moves the playhead to the previous bar.
Selection > Move to Next Clip Edge
Moves the playhead to the next clip edge on the selected track or tracks.
Selection > Move to Previous Clip Edge
Moves the playhead to the previous clip edge on the selected track or tracks.
Selection > Move to Next Marker
Moves the playhead to the next marker.
Selection > Move to Previous Marker
Moves the playhead to the previous marker.
Selection > Extend to Next Transient
Extends the selection to the next transient in the selected tracks.
Selection > Extend to Previous Transient
Extends the selection to the previous transient in the selected tracks.
Selection > Extend to Next Bar
Extends the selection to the next bar on the selected tracks.
Selection > Extend to Previous Bar
Extends the selection to the previous bar on the selected tracks.
Selection > Extend to Next Clip Edge
Extends the selection to the next clip edge on the selected track or tracks.
Selection > Extend to Previous Clip Edge
Extends the selection to the previous clip edge on the selected track or tracks.
Selection > Extend to Next Marker
Extends the selection to the next marker.
Selection > Extend to Previous Marker
Extends the selection to the previous marker.
Selection > Extend to Session Start
Extends the selection to the start of the session.
Selection > Extend to Session End
Extends the selection to the end of the session.
Track Heights > Increase Selected
Increases the height of selected tracks.
Note: by default, this key command is mapped to the macOS command for Mission Control. You must disable or remap this feature to use this key command. To disable or remap this command, in System Preferences > Keyboard, click Shortcuts and disable this key command, or map it to a different key command. Refer to your macOS documentation for more information.
Track Heights > Decrease Selected
Decreases the height of selected tracks.
Note: by default, this key command is mapped to the macOS command for Application Windows. You must disable or remap this feature to use this key command. To disable or remap this command, in System Preferences > Keyboard, click Shortcuts and disable this key command, or map it to a different key command. Refer to your macOS documentation for more information.
Track Heights > Increase All
Increases the height of all tracks.
Track Heights > Decrease All
Decreases the height of all tracks.
Scroll To > Left Selection
Scrolls the Timeline and centers the left edge of the current selection.
Scroll To > Right Selection
Scrolls the Timeline and centers the right edge of the current selection.
Scrolls the timeline automatically one screen at a time during playback and record.
View menu
Item
Key Command
Description
Shows or hides the Focus Browser at the left of the screen. Note that when a Focus Browser is required, this opens, regardless of this setting.
Section > Focus Channel
Shows the Focus channel in Timeline view.
Section > Track Versions
Shows the Versions panel in the Timeline track controls.
Section > Mixer Navigation
Shows the Mixer Navigation panel in Mixer view.
Section > Control Room
Shows the Control Room section st the right of the screen.
Shows the Monitor section at the right of the screen.
Shows the Info section at the bottom of the screen.
Timeline Settings / Rulers / Clips
Shows the settings for the Timeline, Rulers, and Clips in the Focus Browser.
Shows the Notifications pane at the right of the screen.
Compact Monitor Faders
Makes faders in the Mixer shorter, to allow more visual space for the Mixer rows. You can also click at the top of a fader to compact or expand mixer faders.
MIDI Keyboard Mode
Toggles MIDI Keyboard Mode, to allow MIDI note input using the typing keyboard. Note: MIDI Keyboard Mode overrides some keys that are used as keyboard shortcuts.
Switches between Timeline and Mixer view.
Show All Tracks
Shows all tracks, including hidden tracks.
Windows menu
Item
Key Command
Description
New Alternate Window
Opens a second LUNA window.
Cycles to the previous window.
Cycles to the next window.
Show/Hide Floating Windows
Shows or hides floating windows (for example, plug-in windows).
Toggles full screen mode for the LUNA app.
Help menu
Item
Key Command
Description
Allows you to search for items in the menus.
Links to LUNA documentation on the Universal Audio Support site.
UAD & Apollo Documentation
Links to UAD and Apollo documentation on the Universal Audio support site.
Источник